This week I set about building a rockery. I realise I’m quickly becoming the grand dame of the garden grands projets. First a greenhouse, then a pond and woodland walk, and now a rockery. I’ve achieved allot by tinkering over ten years of gardening at this house but the last year and a half has seen me able to turn some big dreams into reality. Building a rockery isn’t something I thought I’d do on such a big scale but the site cried out for a change.
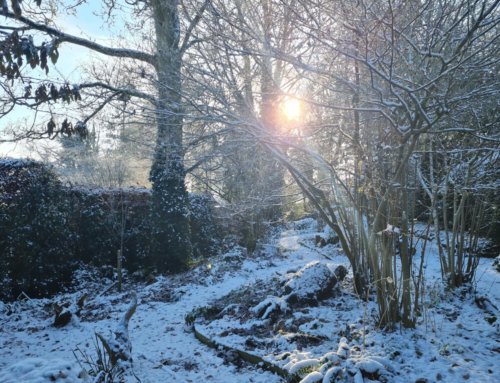
Site for a new rock garden

I’m a bit of a plantaholic, an affliction that led to an interest in the thousands of amazing alpine plants out there and to start a diary for the Alpine Garden Society. A rockery rocketed up my wish list.
It suddenly dawned on me that I had the perfect spot for one, an area that is right next to the rear patio, either side of some lovely shallow steps.
The picture above is of the site. On first view it probably looks like the two beds should be easy to design and plant but due to the slope I’ve always found it difficult to assemble the right collection of plants for year round colour. Nothing has ever quite worked. Yet this is the perfect site for a rock garden as it was just begging to be terraced somehow. The slope will aid drainage and given it’s a pretty open spot, unshaded for much of the day, it’s ideal for alpines.
Building the rock garden

I could not have built this alone and asked the same contractor that built my pond to help me. I needed muscle and machinery but wanted to design it myself. The company had contacts at a stone merchant and could arrange to hire a forklift truck to get the mega monoliths around the side of my house and into place.
We had chosen some very large stones made out of Purbeck limestone and to say I was nervous the morning of the build is an understatement. Could I work out where to place them? Could it look like a mountain slope or would it end up like a currant bun?
We put the large stones in first, using the forklift. These are known as keystones and it’s important to think of how they draw the eye up the slope and to excavate out the soil first to make sure they look like they are emerging from the ground rather than plonked on top.
That was the easy bit – placing the smaller stones was much much harder. We spent at least two hours arranging before I decided less is more and took several of them away. The whole thing took a day and a half to complete, including delivering the stones, moving them to the site plus a few short tea breaks.

My patient helpers who didn’t mind all the moving, rearranging and changing my mind that went on that day.
We all were very happy with how it looked in the end. Next step is to dig lots of grit into the soil for good drainage. Once that’s done I think it’ll be an amazing showcase for some rock star stunners next year.
Mini Crevice Garden

The large stone at the top right hand corner of the right hand rockery bed looks fabulous from the front but its placement let to a triangular bare corner at the rear. I decided to try and build a mini crevice garden here out of some old broken paving slabs. The spaces in between the slabs will be filled with a gritty compost mix.

RHS Wisley’s Crevice Garden
Crevice gardens are, it turns out, a fairly recent phenomenon in the world of alpine gardening, only being around for the last thirty to forty years. The concept is based on mimicking the natural uplifted strata of mountain karst scenery. Alpines are used to sending long roots into rocks fissures in search of moisture. Scientific studies have shown that by giving plants a long cool root run in between stones, a microclimate is produced, leading to condensation based watering and sheltering the plant roots from winter extreme cold or summer extreme heat.
Here’s a picture of the crevice garden at RHS Wisley, a construction on a much grander scale than mine but a lovely showcase for alpines when in full bloom.
Bog Primula

Away from the rockery, and back in the woodland area I spent a pleasant half an hour in the rain last week, planting bog primula. Many of you may be more familiar with the term candelabra primula, a superb set of plants for late spring colour.

Woodland area at Leonardslee Gardens with gunnera and bog primula.
I was inspired to plant some of these in the boggy area near my newly planted gunnera after seeing this stunning section of Leonardslee Gardens last May. It’s a magical place.
I’m not sure which variety are growing at Leaonardslee but I chose a similar looking variety called Primula wilsonii var. wilsonii which are a burgundy colour.
Sanguinaria canadensis

I know many have experienced the phenomenon of see-it-want-it-must-have-it that accompanies garden blogging and social media. It’s sometimes an expensive affliction but it can also be seen as an educational one.
This plant – Sanguinaria canadensis kept popping up on my twitter feed last spring. A North American native, its common name is bloodroot, since the tubours leak a blood red sap when cut. 
Its pure white flowers and unusual leaf form are unforgettable so when I saw this large clump at RHS Wisley last year, I knew what it was from several paces away and vowed I’d one day posses one.
This week I took delivery of a mail-order plant, wrapped carefully in paper and posted all the way from Scotland from Kevock Garden Plants. It’s now planted in the woodland area in beautifully enriched leaf mould and soil.

Kevock Garden Plants’ spring woodland display at RHS Chelsea Flower Show 2019
As a special treat, here’s a picture of Kevock’s stand at RHS Chelsea Flower Show from earlier this year. What a beautiful stand it was and if my woodland area looks a fraction as good as this next year I’ll be overjoyed.
Magnolia Seeds

I’ve never noticed berries on my Magnolia kobus before but this year there are many of them. I decided I’d have a go at separating the seeds from the berry and seeing if they’ll germinate.
I’ve written a description of what I did in a separate blog article so if you want to give it a go yourself, you can read about it here.
This seasonal diary is part of a weekly link-up of garden bloggers from around the world, called Six on Saturday. For more information and links to other blogs crammed with gardening activity, check the blog of host The Propagator.
Now they’re proper rocks! The new rockery is looking good. Looking forward to seeing it in when then plants are in and established.
Now they’re proper rocks! The new rockery is looking good. Looking forward to seeing it when then plants are in and established.
Hi Graeme – yes they’re monsters aren’t they but I think it was worth it. They looked huge on the pallets but somehow when they were placed and dug in they seemed to shrink visually. Can’t wait to plant it up.
I do like old and big stones. I can’t wait to see these new borders when you fill them with plants and when they bloom in the spring
Yes, the stones look a bit lonely without any plants. I’m aiming for some colourful flowering alpines as well as some dwarf evergreen shrubs. It’ll take a bit of time to get it right but I’ll be having allot of fun making my choices.
Those rocks look seriously heavy, glad I wasn’t the one moving them. I shall be interested to see what you put in there now. Hope they didn’t drive that forklift any further onto the stone paving. I think the Leonardslee primulas are P. pulverulenta.
HI Jim, Yes the stones were heavy and I was really unsure whether to go for it but with the extra help it turned out well. The forklift had to drive over the whole patio but it survived unscathed. Thanks for the name of the primulas – I looked a few up but just wasn’t sure.
You (and your helpers) have been busy! Looks great. I have always wanted to try Sanguinaria canadensis, looking forward to seeing yours in bloom.
Thanks Gill. I’m hoping the sanguinaria likes it in my garden and I promise I’ll be sure to share some pics.
Love the new project! I have some big rocks in my garden but they are scattered around it so no good for a rock garden unless I remove everything else and just have one desert looking space, actually that might not be a bad idea, except I have spent a fortune on plants. I have seen Sanguinaria canadensis in other large gardens and it is a gorgeous flower. Look forward to seeing yours and the rockery in bloom. And your crevice garden idea has given me an idea of what to do with some excess slate tiles hanging around the garden. Thank you!
Those slate sound perfect for a crevice garden. There’s a real skill in putting them together I hear but I’ve just gone for it.
Pretty rock and roll!
Yep – that’s me!