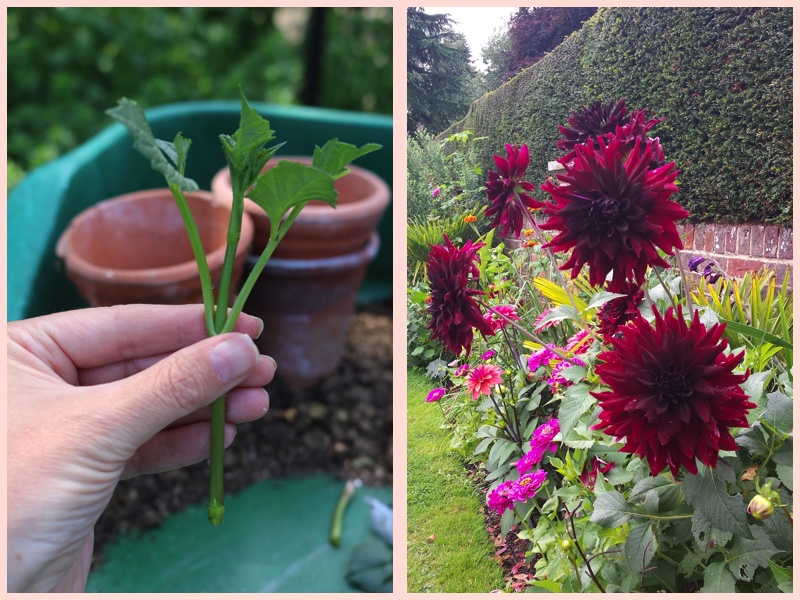
Are you a Dahlia debutante growing Dahlias for the first time this year? Have you grown them before but never tried taking cuttings? Have you got a plant with lots of bushy growth?
If so you could double, triple or even quadruple the number of flowers by taking cuttings.
Each cutting will grow into a strong plant, flowering this season. Each of these, if overwintered correctly, will produce further stems the following spring, for yet more cuttings. The Dahlia really is a gardener’s thrifty plant of choice.
Dahlias root well from cuttings and even beginner gardeners should give it a go. The very first cuttings I ever made were from Dahlias and I admit to being mystified at the magic of propagation but delighted when it worked.
You can read the step by step guide below for full information including how long the cutting will take to root and the optional use of hormone rooting powder.
You can also watch this short video clip that I posted on Youtube. It shows you just how easy it is. Cuttings take just minutes and this approach has always worked for me.
If you want to know more about growing Dahlias please take a look at my Dahlias for debutantes article which gives information on varieties to try, how to grow and how to look after them over the winter.
Step by step guide to taking Dahlia cuttings

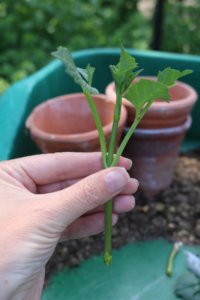
Dahlia shoot, just cut from parent plant
- When stems reach 7 to 8 cm long, they should make good cuttings. Take a good look at the stems coming from your tuber and choose which stems to cut. You may need to push the compost aside so you can see where the stems emerge from the tubur. Stems that can be severed from the parent with a small amount of tuber intact are the first to try. This is because the growth hormones needed for good root development are concentrated in the tuber.
- Take a sharp knife. This can be a gardener’s knife but a kitchen knife will also do. Ideally the knife should be clean and some growers advocate sterilisation through a flame. Hold the chosen stem and push the knife into the tuber and under the stem to cut it away.
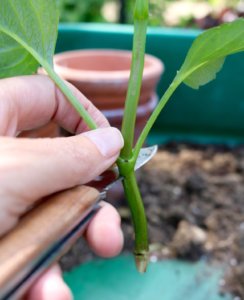
- If some of the light brown woody tuber comes with the stem, you have a perfect specimen. If not, don’t worry as the stem can still be used but you will need to cut the stem under a leaf node as shown in the first picture below. A leaf node is simple to spot as there is a swelling on the stem from which the leaves emerge. It should root anyway as there is also a concentration of growth hormones in the leaf node. If you want to you could dip the cut stem into some hormone rotting power or gel but this is not essential.
- Carefully tear or cut away any lower leaves on the stem and cut the top leaves in half to reduce the amount of surface area through which moisture can be loss.
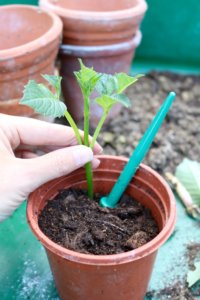
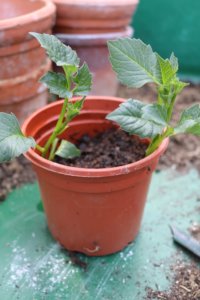
- Fill a pot with compost. Place a pencil into the compost at the edge of the pot to make a hole and put the stem in, gently firming the soil around it. Three cuttings can usually be fitted around the edge of a 9cm pot.
- Water the cuttings. They usually root without covering but if you have a propagator (plastic tray with or without bottom heat and with a clear plastic lid) you could use this. You could also try putting clear a plastic bag over the pot, held in place with a rubber band. Both methods reduce the moisture loss from the cutting but have the potential for the cutting to rot if the atmosphere is overly damp – so do not overwater.
- Cuttings will take 2-4 weeks to develop roots. Resist the temptation to pull the stem to see if it has taken. You will know when it has worked as the stem will begin to grow new leaves. Alternatively, if you have some, use the see-through pots used by orchid growers, or even the plastic cups from children’s parties (with drainage holes punctured in the bottom) as you can see the roots growing without disturbance.
On the to do list for next year 🙂 Thanks!
do cutting produte tubers ?
Yes, the cutting should grow into a good sized flowering plant in its first season. It will develop tubers below ground. Good luck if you take some cuttings! Hope it works for you.
When taking the cutting do I cut into the Tuber or do I do the same as Chrysanthemums and take below the node ?.
Hi Brian. Both methods work. I find cutting into a bit of tubur helps the cutting to root well as hormones are concentrated there. But cutting beneath a node usually works too. You can use hormone rooting gel or powder if you like. Hope they work for you!
What is the best way to over winter first year cuttings some which have flowered and some that haven’t? I have repotted them up to second size pots from small square 9cms one. Thank you
I Ann, apologies for the slight delay in responding. If you’ve potted your cuttings on then they can be stored in their pots in a frost free place as long as you keep the compost dry. If not they will likely rot. If you’re worried about rotting or haven’t somewhere dryish and frost free to store them then you can lift the tuburs from the pots, wash then air dry them for a few days and store them in dryish compost in a box over the winter. Even plants from cuttings this year should have developed some tubur worth storing. Have you got a greenhouse?
If you take a cutting below a node does that shoot continue to grow?
One you cut it below the node to take a cutting, the growth usually stagnates until roots come and then the it starts to grow again. It’s a sure sign that the cutting has struck (roots have developed) when new shoots start to appear. Good luck. I hope it works for you!
What happens to the tuber you cut off of? If this was the only stem on that tuber, will another grow? Is it best to do this only to tubers with multiple eyes/stems? Or will new stems develop?
Thank you for your guide, you have given me hope of recreating my favorites without breaking the bank!
Hi Dana – this is a very good question. I do this in late spring once the tuburs are starting to grow but sometimes I do find that new bought tubers only throw up one stem. As you say, it would not be a good idea to remove this at the base!
BUT, if you wait until it has grown a bit you can cut out the growing tip to make a cutting. Don’t be scared to do this as the cut stem will throw out two new shoots either side of where you cut it. This will make a bushier plant from the original tubur and hopefully your cutting will also grow. Hey presto – two plants!
I remember the first time I did this just worrying I’d kill it all but when some worked I realised how many plants I could get for free. And remember this is only what commercial growers are doing to create their stock. Good Luck.
Hi , i have just bought some pot tubers I would like to take cuttings from these I have an electric propagator. Can you advise me when is the best time to start them off. . Thank you
Hi Tony, It sort of depends what space you have to grow them in. I’ve started them off in my kitchen in Feb/March when I didn’t have a greenhouse (luckily my family didn’t mind!). If you do have a greenhouse then it’s still cold in the UK in Feb and March so a heat mat under the pots really helps to get them going. You can wait until no frosts likely to pot them up outdoors (they’ll be fine in the package until then if kept in a cool dark place) but this will delay you being able to take the cuttings…
Hope that helps and happy growing,
Katharine
Hi Katherine
I inherited a border of dahlias which I have just left to its own devices for 5 years adding only chicken manure and bark as protection over winter. Over the years, a few have died but I am left with about 5 huge plants in purple and white, a mixture of pom-poms and spidery types !!! (that’s all I know) I have never dug them up and I don’t know what lies beneath the surface. Is it worth digging them up now and doing a bit of an inventory on them? Do dahlia’s multiply in the ground? ie could there be more than one tuber per plant and should these be split? Also if you get a single tuber that has broken away from the plant could this develop into a plant in its own right?
Many thanks
Karen
Hi Karen,
It probably is a good idea to lift your dahlias and have a look. I’ve heard that the quality and number of blooms begins to suffer as tubours get older. You can look for any mouldy squashy bits of the tubour pull these off. You can then indeed split the tubours to make multiple plants. If you pull off just one of the lobes I’m not sure it’ll be viable but if you have a few near a stem point then that will be. You could also think about taking cuttings. Hope it works out for you and you’ve reminded me to take a look at some of the ones I’ve left in the ground!
Hey, I’ve enjoyed your article… I’m a complete beginner, but I bought a load of tubars, planted them in pots… and now they’re sprouting nicely. Can I take cuttings then leave them in the greenhouse over winter in pots?
You can definitely use the sprouts for cuttings – It’s always worth trying. They will actually flower this year from cuttings if you plant them out. In fact I saw a piece on Gardeners World recently where a dahlia grower said you get better quality blooms from cuttings than from the original tubours. Good luck and let me know who you get on.
Thanks for getting back to me Katherine – That’s interesting, I will start lifting them and see what is going on. I bought some new (v expensive!!) tubers this year for the first time ever!!! They are in the greenhouse sprouting. I took my first cutting yesterday and will take more as they grow on, but I will also collect some cuttings from the old tubers this year – that’s a great idea. I have only ever bought potted dahlia plants from the garden centre previously and these were destroyed by slugs as soon as they went in the ground! I am really excited to see what results I get this year – I will put the cuttings into pots to keep them away from the slugs and get my chickens onto pest control in the beds!! I think your garden looks amazing by the way and your website is so informative – I’m about to refashion a couple of old butler sinks and rework my alpine beds next!! Keep up the good work. Karen
Thanks for the lovely feedback and I’m so happy to hear you have chickens for pest control and that you’re going to make some alpine troughs. I think alpines are brilliant plants and they do look fabulous in troughs. Let me know how you get on.
[…] winter. Last week’s Beechgrove garden reminded me it was a good time to take dahlia cuttings. Tea break gardener has a good guide on how to do this. In the case of dahlias, this is supposed to help make the plant bushier as well as increasing your […]
Hello I have lots of Dahlia coming up in my garden and have read , but have not done it myself before) that you should reduce the bushier plants to only 4 or 5 stems. Do you recommend this and if so how do I go about it ? Thanks for your help Jane
Hi Jane, I can’t say I’ve ever counted the number of stems on each plant but what I do always do is pinch out the growing tips of each stem. New shoots sprout either side of the pinched out stem and you get more flowers. That’s what you want in a garden I think – lots of flowers. I think if you’ve growing for large specimen blooms for floristry or show you probably would reduce the total number of stems. Hope that helps?
Due to illness after starting dahlias off I have left some dahlia tubers a little longer than I intended and they have now become quite substantial young plants whilst still growing from the tuber. Can I still take cuttings now or would it be best to divide the tubers ?
Are they new tubours to you this year? If they are I would not split them yet but plant them out as they are rather than splitting them. I am a curious person though so presented with a situation like this myself I would take some cuttings just to see what happens. In my youtube clip you’ll see I have taken out the growing tips of some fairly long shoots and used these as cuttings. I’ve found they do root this way. Whatever you do, enjoy your dahlias and don’t worry you’ve come to it later than you wished. Such things always happen and generally plants are very forgiving. Good luck!
I am a novice gardener but after watching your video I am confident to try taking cuttings. Just on question do I need to leave them in a greenhouse because I don’t have one?
Hi Jen. That’s great to hear and yes do give it a go. I was nervous first time and some of mine rotted but the one that struck was enough to get me hooked. You do not need a greenhouse – the first ones I tried were grown in my kitchen. Some people recommend putting a clear plastic bag over them, held around the pot with a rubber band, a bit like a mini greenhouse. I have found this unnecessary and in fact I’m sure that’s why some of my early cuttings rotted. Good luck!
Right. Cuttings taken and growing well. What next? How long should they stay in the pot? When do I separate them/ When can they go into the garden? Thanks. Judith.
Hi Judith – great news your cuttings have struck. Once they’ve got a good set of roots on them you can tease them apart. I’ve planted rooted cuttings straight out into the garden in June in the UK but kept an eye on them to make sure they won’t be swamped by bigger plants until they grow bigger. Look out for slugs and snails too as they like tender dahlia shoots. If you want to play it safe or you don’t know where to plant them yet then you can separate them and pot them individually into bigger pots and grow them on a bit longer before planting out. Wishing you every success!
Hi. New to dahlia growing. I took cuttings from a plant and tjree out of four have rooted and they are now growing rapidly in bigger pots. My question is do I pinch out the growing tip? Also do I lift these new small tubers and store the same as my other tubers over winter? Thanks.
Yes – definitely pinch out the growing tips as they will branch and result in more flowers. And yes, if you do lift and store your tuburs so the same for the smaller ones too.
Hi, you have great knowledge concerning Dahlias. My friend gave me a tuber, didnt know what it was until it grew so tall and she told me the name of the plant. I have one stalk. How can I get more babies from the one plant? Thank you.
Hi Phillipa, Having one stalk isn’t unusual. Sometimes a tubur only throws up one stalk. If you take a cutting of this one stalk as described in this blog article, the stalk will shoot either side from where you cut off the cutting. You’ll get a branching in the stalk that way and therefore a bushier plant!
My friends dahlias have not produced any tubers…….what can she do?
Are they from cuttings? If so cuttings will eventually produce small tubers below the soil over the growing season. If the cuttings are recent, they will not have had much time to develop a tuber. If she wants to she could overwinter the whole plant in a pot with dryish compost in a frost free place over the winter. The plant will go dormant but if there’s some tuber development, it should hopefully sprout again next spring and the tuber will continue to develop. It’s worth a go for sure?!
Hi Katherine, I took cuttings from a few shoot late summer and they are growing well in my pot, indoors. Do I let them keep rooting growing through the winter or do they need a window of dormancy before spring comes? Thanks! Your article was a great help!
Have they rooted Steph? It sounds like they have. Normally I take my cuttings earlier in the season so there is a bit of time for a tuber to build up, then the plant does indeed go dormant for winter. So I’ve never had a baby plant going into winter. Try and take a look under the soil to see if you’ve got a bit of tuber that’s developed. This is where the energy is stored for the plant regrowth next spring. If you’ve got some tuber, let it grow on for a bit then reduce watering and keep it somewhere cool and dry for the winter then rev it up again in spring with some water and heat. If there’s no tuber growth I’d be tempted to try and keep it growing for longer. Note – I’ve never actually done this before but as yours is indoors anyway, you can extend the growing season a bit, unlike garden grown plants. Keeping my fingers crossed for you and it sound like you have some strong plants there which will definitely help.
Great information here! Something I’m wondering that I haven’t been able to find an answer to- is it okay to pull tubers out of storage early to take cuttings? I’ve read they should have at least 90ish days worth of a dormant period before growing the next season. I’m at about the 60 day mark but want to get a jump start on the varieties I grew last year. What I’m thinking is that the tubers will still send up shoots but maybe not as vigorously but I will still be able to get cuttings started early. I’ve also seen that growers who start cuttings early enough can then take cuttings from the cuttings. What do you think? Is 60 days enough time to pull them out for cuttings? Thanks in advance!
Hi Chelsey – I hadn’t heard about the 90 day dormancy thing. I’ve learned that whilst such things may have some basis in science, plants usually make up their own minds as to what they’re going to do and when! I think the earliest I’ve potted tubers is February – in my greenhouse and I have to admit they sometimes take their time to get going even on a heated mat. Maybe that’s the dormancy thing? Anyway, if you have the facilities you can start them off soon. Remember – once they get going they grow very fast and the plants from cuttings are very vigorous. Good luck!
Hi chelsey
This is the first time that I am growing dahlia, I have potted them up to help them along, I just want to know is it ok to keep them outside or do they need to be in doors, thank you
Hi Rose,
They are usually fine outside as long as you don’t get really cold weather or frost so most people start them off indoors or in a greenhouse. It promotes growth much sooner too. Good luck, and I hope you get lots of blooms.
Hi I am ordering in some tubers from online. I want to get as many dahlia plants blooming by August 28th which is my wedding day. How long does it take to get cuttings to bloom? They ship to me late March so I am a little late already. Thank you!
HI Rebecca,
What a lovely idea to grow some dahlias for your wedding. It’s really difficult to predict when you will get flowers as it’s very weather dependent. It is possible to get flowers on cuttings this year but if they’re not going to arrive until late March and then you’ve got to get them going, 28th August is tight I’d say. If you have a greenhouse or can start them off indoors or on a heated mat or propagator, that will get them going quicker. Growing them on in a greenhouse and really forcing them will also speed things up a bit. I’d say give it a go but maybe have a back up plan. There are UK growers of florist dahlias who you could talk to. They may also have some tips for you as they are used to growing to deadlines. This is a good website to take a look at https://www.flowersfromthefarm.co.uk/ Wishing you luck and a wonderful wedding – let me know how you get on.
Hello Katharine,
I have some young dahlia plants grown from seed and I will take cuttings from tubers eventually. There is conflicting advice on when to pinch out the growing stem to encourage branching out of the plant. What advice would you give, please?
Hi Miriam, I always pinch out the growing tips on mine as I want lots of flowers and a bushy plant. I think possibly those that choose not to are maybe growing for show etc and want a nice strong leader stem with flowers atop?
Hi Katherine
I have planted up my Dahlias in individual plant pots to get them going and they are in my house. Once they are growing can I re plant them into my outdoor tubs?
Also I have put some in tubs already but without any growth yet. Should I cover them with fleece if frost is expected once they start growing ?
Marianne
Hi Marianne, dahlias do succumb to frost so don’t plant out until you know that there is no risk of cold weather. I would definitely cover any dahlias outside if cold weather is forecast, or move them indoors or to a garage or shed. Good luck and I hope you get lots of lovely flowers this summer!
Hi Katherine,
Thank you for all the advice about Dahlias.
I have some tubers given to me and they have been sitting dry and at room temperature for a couple of weeks as I was waiting for warmer weather to plant out directly. I now realise I probably should have started them off indoors in pots maybe a month earlier! I held back because it has been so cold and I don’t have a green house or cold frame.
Should I start them now in pots indoors anyway or try for direct planting in the garden?
Deborah
Hi Deborah,
I would probably pot them up somewhere warm indoors to give them an initial boost. You could plant out directly but it’s been such a cold season so far they may languish for a while. Hopefully they won’t have dried out too much whilst you were waiting…
Hi Katherine,
My new dahlia tubers have all sprouted indoors and now have stems and leaves, and are getting quite tall. When I plant them out in the garden border, how deep should I plant them? Should I bury them 10 cm or so deep covering the stems and leaves? I leave the tubers in the ground over winter. What do you advise?
Hi Kath – It’s not wise to plant them out until the weather warms up a bit and you’re sure there will not be frosts. It’s a good idea to pinch out the growing tips as this will stop the plant from getting too big and leggy and will also mean you get a bushier plant with more flowers. Don’t be afraid to do this – the plant will send out new shoots from either side of where you pinch out the stem. When you do plant them out, do so with the tuber underground but the green stems coming out of the soil. Leaving the tubers in the ground is always a hot topic of debate. I’ve started leaving mine in the ground covered with a thick layer of mulch. They usually survive but the new stems often get attacked by slugs and snails!
Thank you for your really helpful article, I’ll definitely try taking cuttings this year.
Can you take cuttings from plant and put in water to get roots?
Hi Jean, I have always rooted mine in compost. I think stem cuttings will rot easily in water…
Hi love your site and advice. I have pinched all my dahlias but I didn’t know you could plant the tip. Do I just put it in a pot? Should I dip end in rooting powder? Tia
Hi Laurie, Yes, I would use rooting powder for shoot cuttings with no tuber attached.